Using ThirdFi Fiat-to-Crypto API in a self-hosted backend

#BuidlWithThirdFi, Learn

Written by Ankit Singh

ThirdFi is a DeFi middleware that connects traditional finance and Web3 finance to make DeFi more accessible. Its Fiat-to-Crypto integration allows users to buy crypto directly within apps using fiat currencies, simplifying the process and increasing convenience. In this blog, we will be covering the Payments API provided by ThirdFi and what are its benefits. Currently, ThirdFi uses Transak as one of our providers which is used by us to make it easier for integration of fiat-to-crypto payments. If you are new to building with ThirdFi API, check out the ThirdFi Developer Guide.
 
Developers can integrate Payment API into their apps and provide additional functionality for in-app purchases and integrate new features into their apps. Here is the complete guide to the Fiat to Crypto OnRamping. Below are some use cases that can be worked upon using the ThirdFi API.
 

1. In-App Crypto Purchases: Developers can integrate ThirdFi’s API to enable users to buy cryptocurrencies directly within their apps using fiat currencies. This creates a seamless user experience by eliminating the need to use a separate exchange for crypto purchases.

2. Remittance Services: ThirdFi can be utilized to send fiat currencies across borders quickly and securely. This is especially beneficial for remittance services, where individuals need to transfer money to family or friends abroad. With ThirdFi’s Fiat-to-Crypto payments, users can effortlessly convert their local currency to cryptocurrency, which can be sent across borders within seconds. The recipient can then convert the crypto back to their local currency if necessary.

3. Decentralized Finance: With ThirdFi’s Fiat-to-Crypto payments, users can conveniently convert their fiat currency to cryptocurrency, which can be used to invest in various DeFi protocols such as lending, borrowing, and yield farming.

4. Payment Gateway: ThirdFi can serve as a payment gateway for merchants interested in accepting cryptocurrency payments. This feature is especially advantageous for merchants looking to broaden their customer base by receiving payments globally. With ThirdFi’s Fiat-to-Crypto payment system, users can effortlessly convert their local currency to cryptocurrency, enabling them to make purchases from merchants who accept crypto payments.

Integrating the buy crypto feature is super easy with ThirdFi, even for the web2 developers. Developers can easily create a user session for crypto purchases as per the user’s request and provide fiat-to-crypto on ramping as an additional feature on the apps. Let’s try building a NodeJS app to buy crypto using the ThirdFi API. But, before that, you need to get API Keys from ThirdFi’s developer dashboard.

Getting ThirdFi API Key

1. Create an account on https://app.thirdfi.org/ and you will be redirected to the dashboard like this below.

thirdfi dashboard

2. From the setting menu, select sandbox environment for testing purposes. You can do the same with ‘API setup’ instead of selecting ‘Sandbox’ environment.

creating API key sandbox environment
 

3. From the dashboard, click on ‘Create New Sandbox Key’ to get an API Key and the Secret. Save these keys and keep them secret as these will be used to make API calls.


Setting up Webhook

Let’s set up a webhook to listen to any transaction event and get updates on the user transactions. The Webhook setup page can be found at ThirdFi Dashboard -> Settings -> Webhooks. Make sure to tick the Sandbox option if you want to receive it for the sandbox transaction.

You can https://webhook.site to get a custom link to receive a webhook. You can also use your own site for the same and listen to the events.

ThirdFi will make a POST request to the link whenever a transaction is done.

Now, Let’s try making requests to the Fiat-to-Crypto API. Head over to the docs here to know more. Also, check out the API reference to know how to get started.

Let’s Test out the Fiat to Crypto API

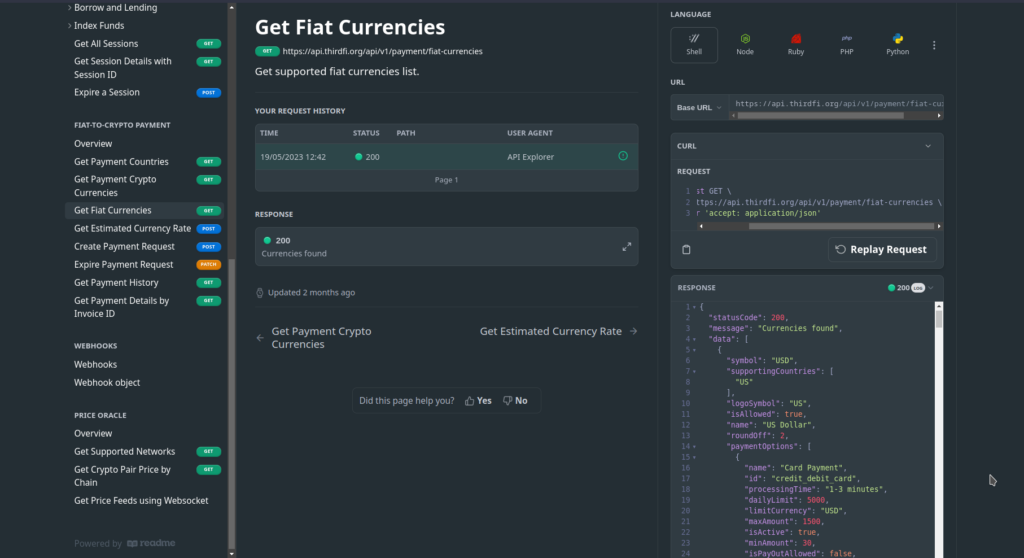
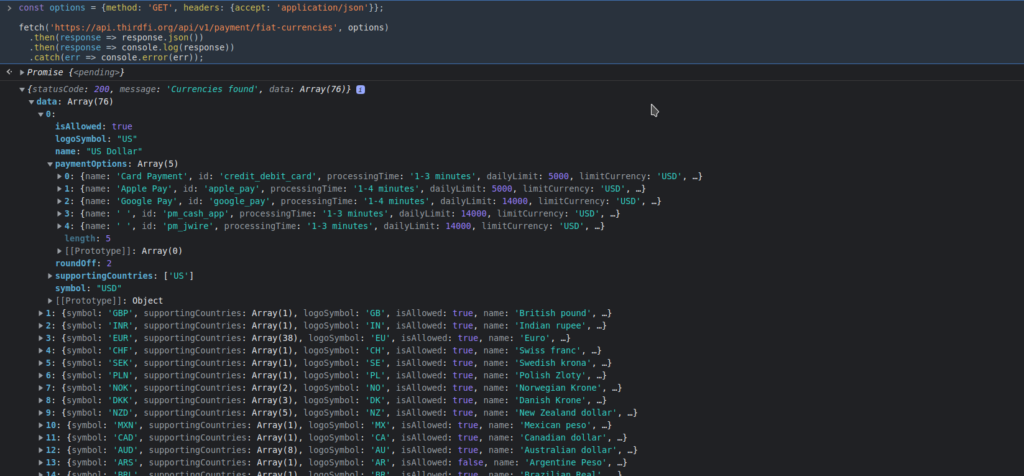
Let’s make an API call using NodeJS, you can try running the same after getting the API key from the ThirdFi dashboard. Let’s start by getting the list of supported Crypto Currency and Fiat Currency using ThirdFi’s API. There are no headers required for fetching the supported Crypto and Fiat currency and it can be done from the API reference too. You can try getting the response in any of the supported programming languages.


Get Supported Crypto Currencies


Get Supported Fiat Currency


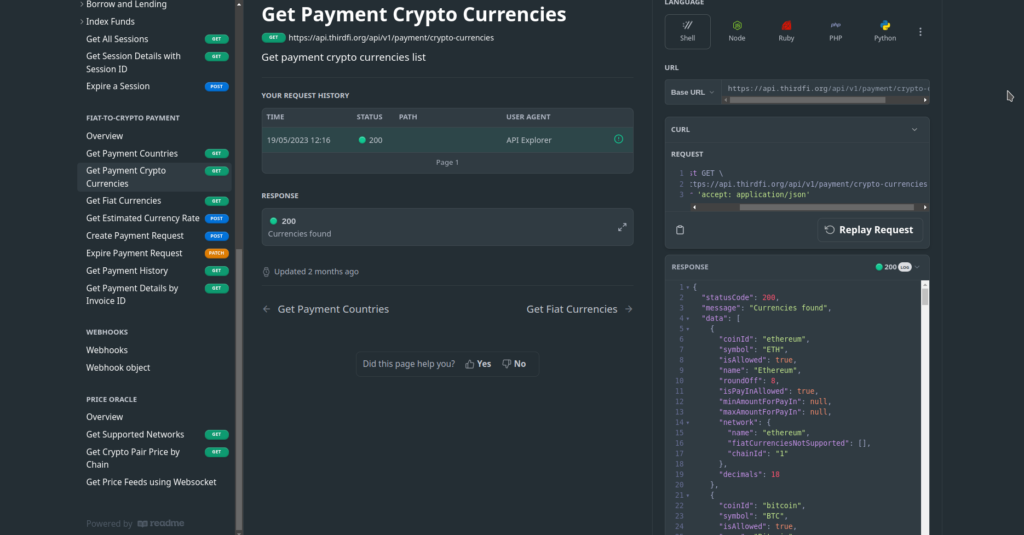
You can also fetch the supported FIAT and Cryptocurrency using your Command-Line or with Javascript, using a simple fetch request.

Now, let’s try creating a payment session by making a POST request to this URL – https://sandbox.thirdfi.org/api/v1/payment. We will need a network(blockchain network), cryptocurrency, wallet address, User Mail address and supported Fiat currency with the payment method.

But before we can create a payment session we have to create a customer using our API credentials. Creating a customer is easy, we can make a POST request to the Customer’s API with just a valid email address. Below is the NodeJS code for the same, it will create a new customer with “abc@gmail.com”. The user account will also be visible to the developer on the ThirdFi developer dashboard under the Customer section.

 
import axios from “axios”;
import crypto from “crypto”
import moment from “moment”;
import dotenv from “dotenv”
dotenv.config()
 
let data = JSON.stringify({
“emailAddress”: “abc@gmail.com”
});
 
const URL = `https://sandbox.thirdfi.org/api/v1/customers`
const METHOD = ‘POST’
const timestamp = moment().unix()
let baseString = `${URL}&method=${METHOD}&timestamp=${timestamp}
&body=${JSON.stringify(JSON.parse(data))}`
 
const hash = crypto.createHmac(‘sha256’, {{SECRET_KEY}})
.update(baseString).digest(‘hex’);
 
let config = {
method: METHOD,
maxBodyLength: Infinity,
url: URL,
headers: {
‘x-sec-key’: {{API_KEY}},
‘x-sec-ts’: timestamp,
‘x-sec-sign’: hash,
‘Content-Type’: ‘application/json’
},
data: data
};
 
axios.request(config)
.then((response) => {
console.log(JSON.stringify(response.data));
})
.catch((error) => {
console.log(error);
});


Now, Let’s Create a Fiat to Crypto OnRamping session. Below is the code to create a webview session for paying fiat and getting crypto in the respective crypto wallet.
 
 
import axios from “axios”;
import crypto from “crypto”
import moment from “moment”;
import dotenv from “dotenv”
dotenv.config()
 
let data = JSON.stringify({
“network”: “polygon”,
“walletAddress”: “0x64F53914013ADcE581B2EA9f8E335D50996646b6”,
“emailAddress”: “abc@gmail.com”,
“trxType”: “Buy”,
“fiatCurrency”: “MYR”,
“fiatAmount”: 200,
“cryptoCurrency”: “USDT”,
“redirectURL”: “https://app.thirdfi.org/”,
“isDisableCrypto”: false,
“cancellationUrl”: “https://app.thirdfi.org/”,
“paymentMethod”: “credit_debit_card”
});
 
const URL = `https://sandbox.thirdfi.org/api/v1/payment`
const METHOD = ‘POST’
const timestamp = moment().unix()
let baseString = `${URL}&method=${METHOD}&timestamp=${timestamp}
&body=${JSON.stringify(JSON.parse(data))}`
 
const hash = crypto.createHmac(‘sha256’, {{SECRET_KEY}})
.update(baseString).digest(‘hex’);
 
let config = {
method: METHOD,
maxBodyLength: Infinity,
url: URL,
headers: {
‘x-sec-key’: {{API_KEY}},
‘x-sec-ts’: timestamp,
‘x-sec-sign’: hash,
‘Content-Type’: ‘application/json’
},
data: data
};
 
axios.request(config)
.then((response) => {
console.log(JSON.stringify(response.data));
})
.catch((error) => {
console.log(error);
});
 
 
Below is the body used for making a POST request to create a Payment session to buy cryptocurrency. Check out the API reference here.
 
    {
        "network": "polygon",
        "walletAddress": "0x64....46b6",
        "emailAddress": "USER_MAIL",
        "trxType": "Buy",
        "fiatCurrency": "MYR",
        "fiatAmount": 200,
        "cryptoCurrency": "USDT",
        "redirectURL": "https://app.thirdfi.org/",
        "isDisableCrypto": false,
        "cancellationUrl": "https://app.thirdfi.org/",
        "paymentMethod": "credit_debit_card"
    }

There are three API headers that are used in ThirdFi API requests and all of them are required to successfully make an API request. In Postman, we have already added a pre-script to load the API headers but we need to calculate them programmatically. The headers are:

  1. x-sec-key  : ‘API KEY’
  2. x-sec-ts     : ‘Timestamp’
  3. x-sec-sign : ‘Hash Value’


The Hash value is calculated using the HMAC-SHA-256 function which takes two inputs, one is the base string and the other is the SECRET key. If you haven’t please check out this Getting Started guide to learn more about the authentication and API part.

Result(after calling the Fiat-to-Crypto API)

To run the code, you should have NodeJs installed and to run you have to run the below command

node path/to/the/code/file

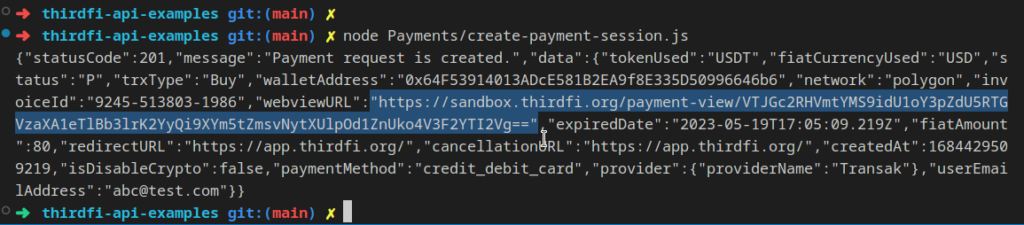
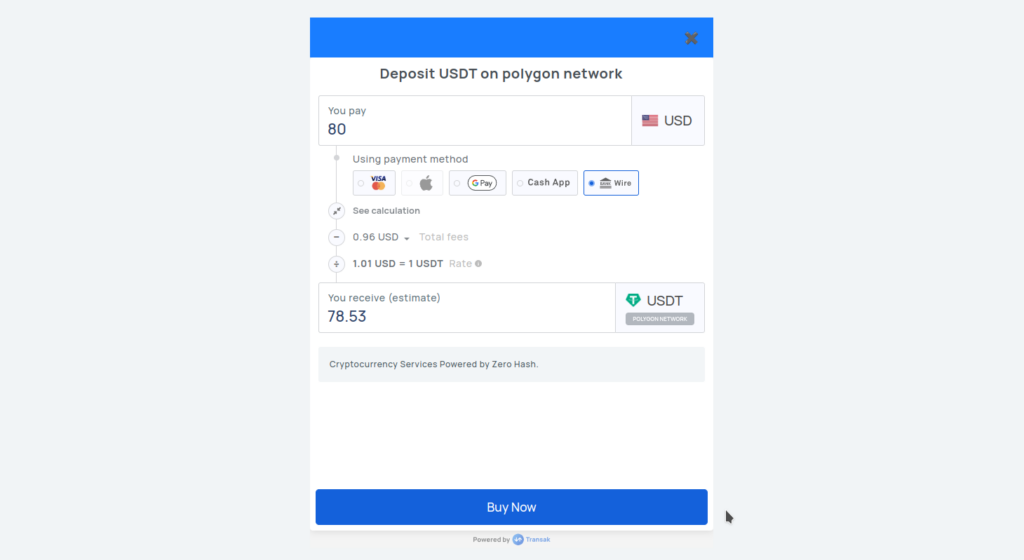
The highlighted session URL can be used for buying crypto using Fiat money, let’s try using the link to get crypto in our wallet. Clicking on the “Buy Now” button will make the user do a little KYC process and then complete the payment procedure.


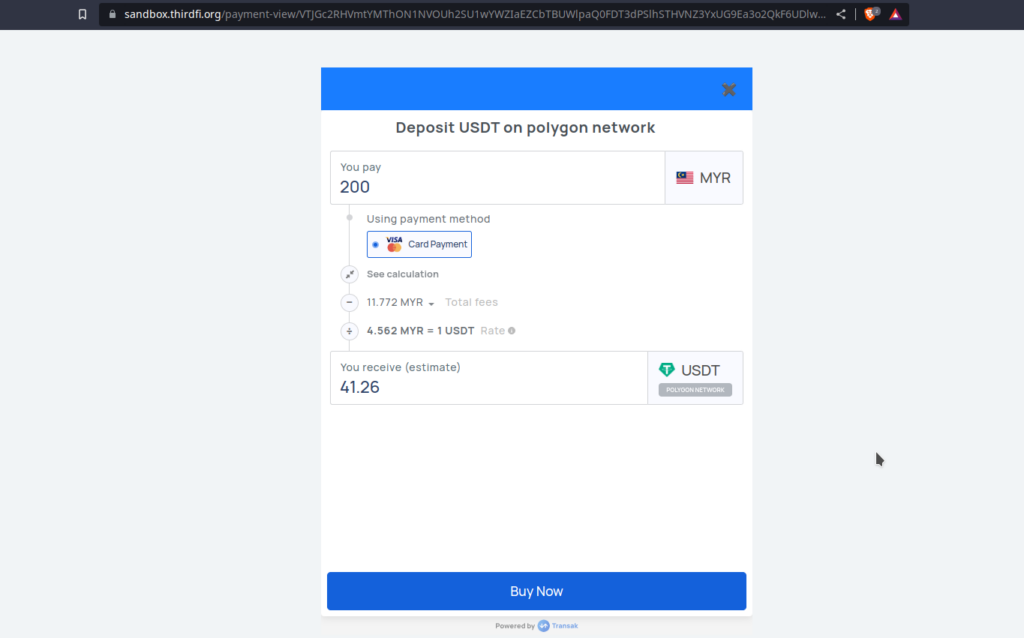
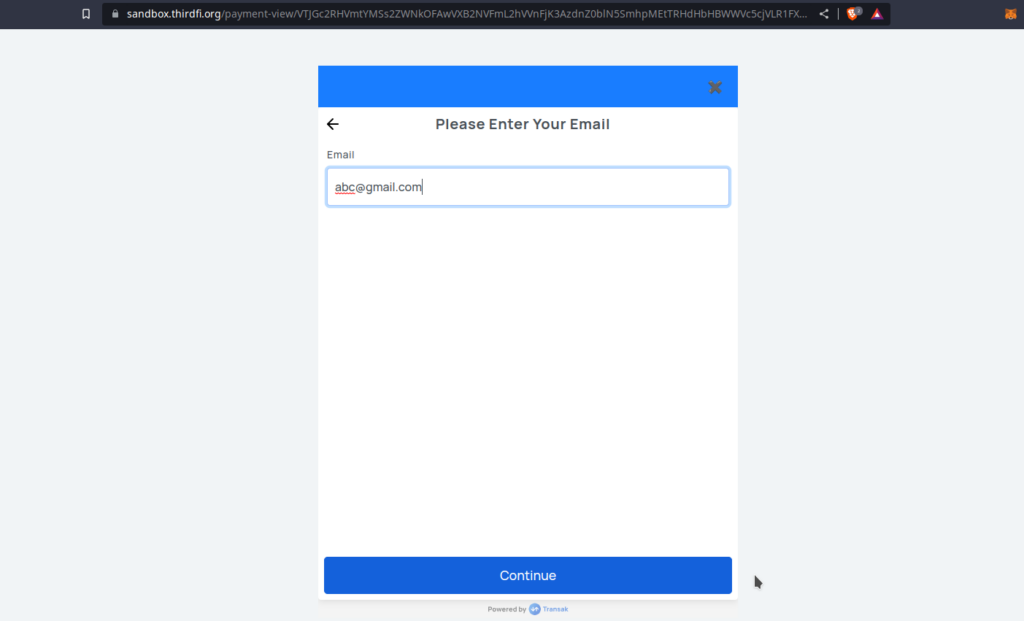
As we are using Sandbox(testing) environment here, we won’t receive any crypto for the payments and you don’t need to put your actual bank/card information here. But firstly the user needs to verify their e-mail address with OTP.


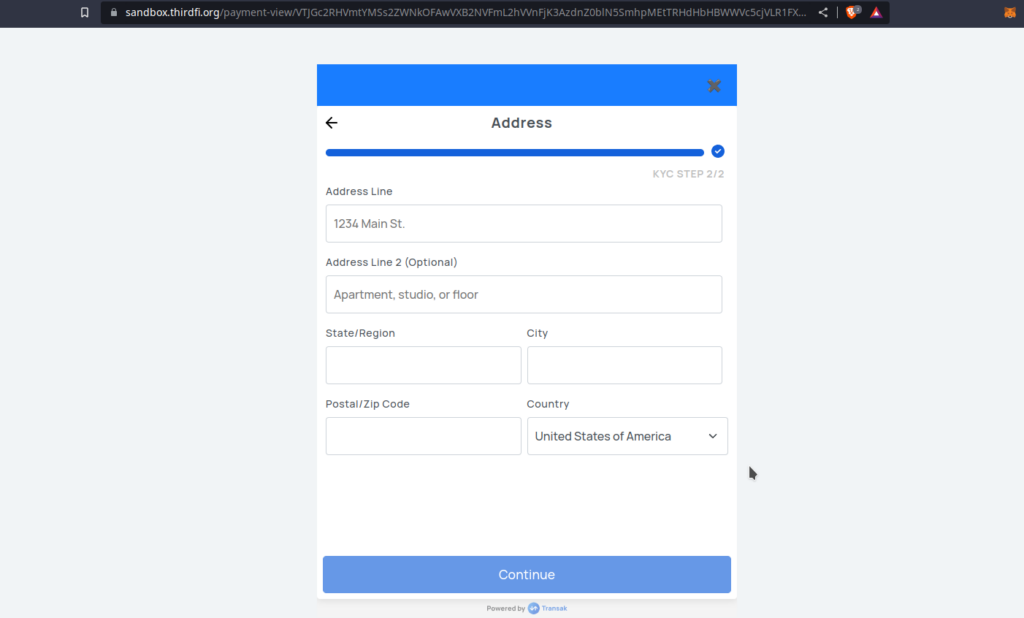
After E-mail verification, the user needs to input their address details for KYC verification. Once done


Address is also included in the KYC process but taking a selfie is not necessary in Sandboxed environment.


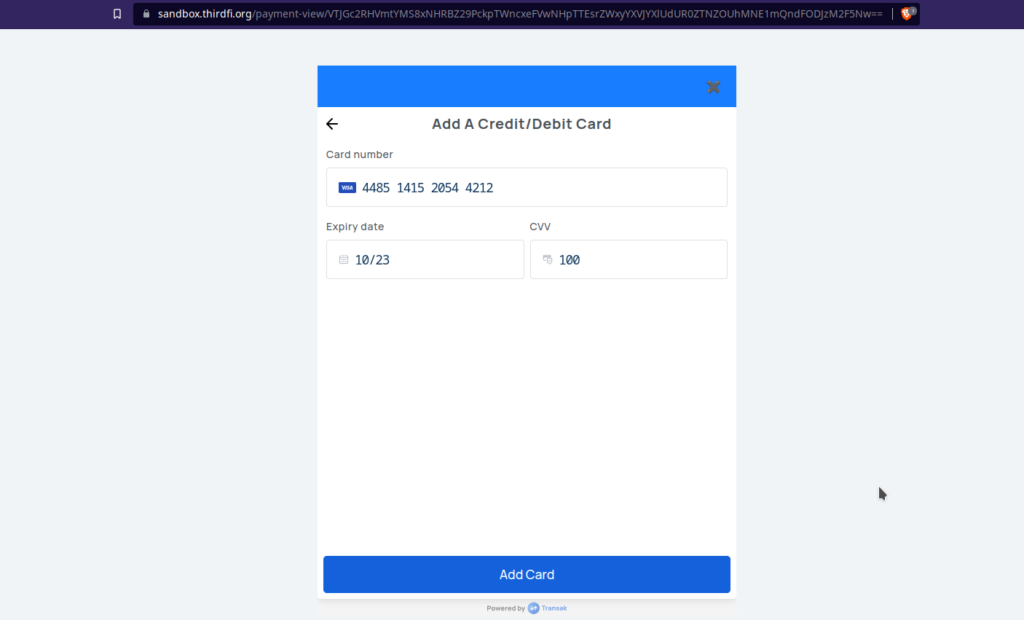
After the KYC process, the user will be redirected to add a payment method. In the staging environment, the identity document verification and selfie check are skipped but if it asks for Social Security Number, you can enter this – 000000001

For the Sandbox environment, the below credential can be used for payment. It is just for testing purposes, it won’t affect the user’s wallet and it is just a simulation.

Card TypeCard NumberExpirationCVV
VISA411111111111111110/23123
VISA448514152054421210/23100


Now the user can click “Confirm” to complete the payment part.


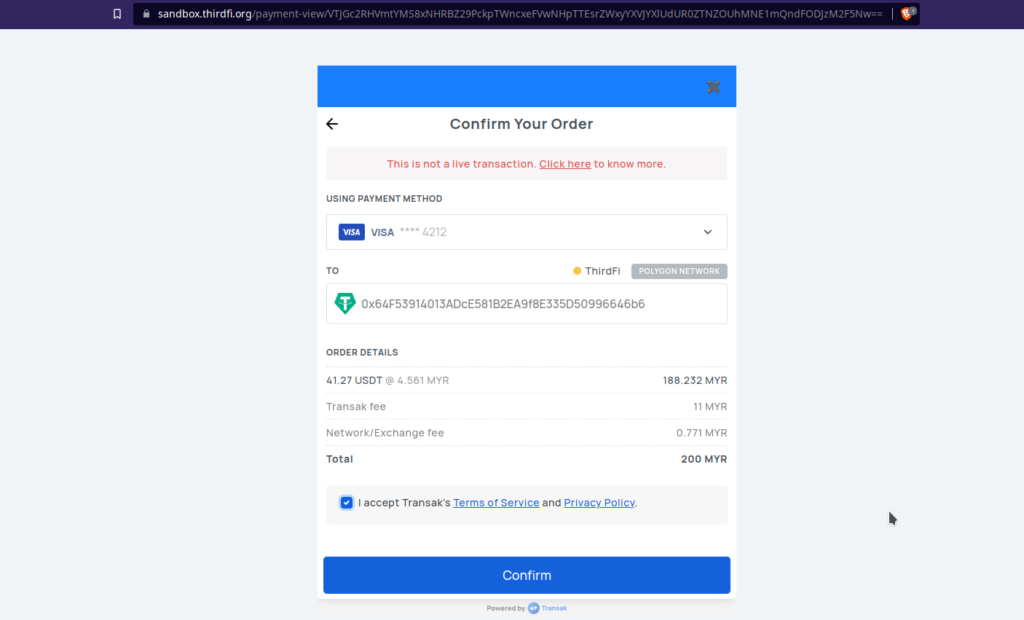
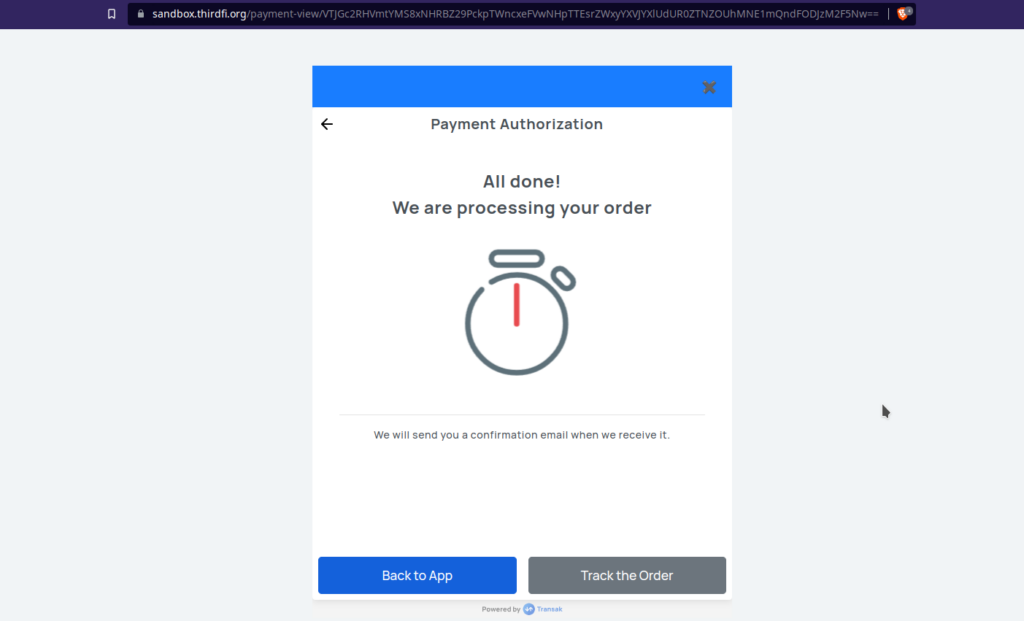
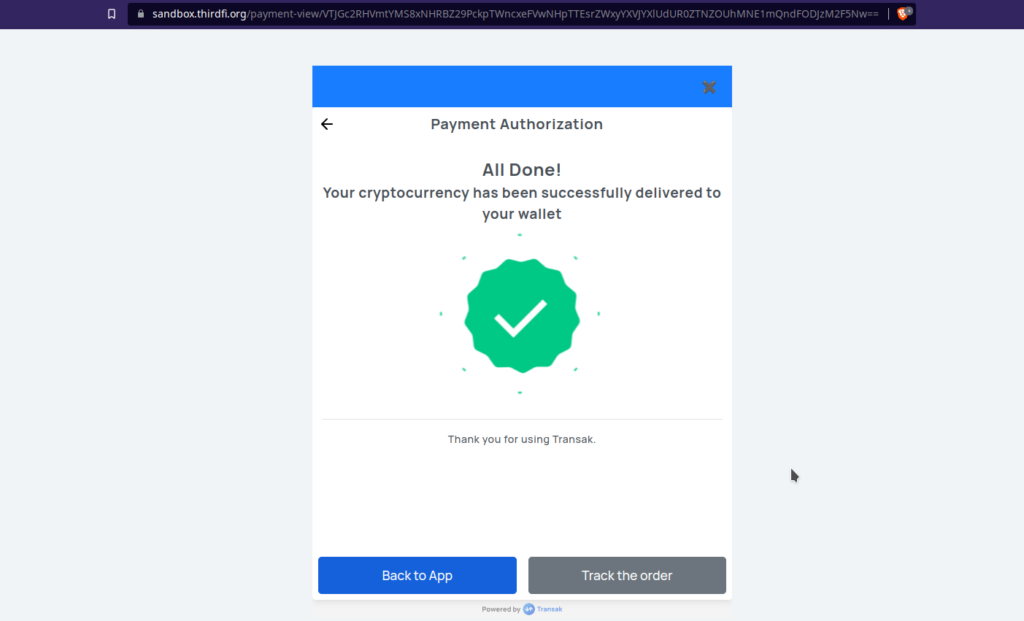
The user can track their payment from the webview and it will show a successful page once the payment is completed.


You can find more about the testing credentials here.

Webhook Event

If you have added the webhook event on the ThirdFi dashboard, you can also receive a webhook to customize the user experience further. Here is how you can set up webhook on the dashboard.

Here is the webhook received for Buying Crypto currency using Fiat.


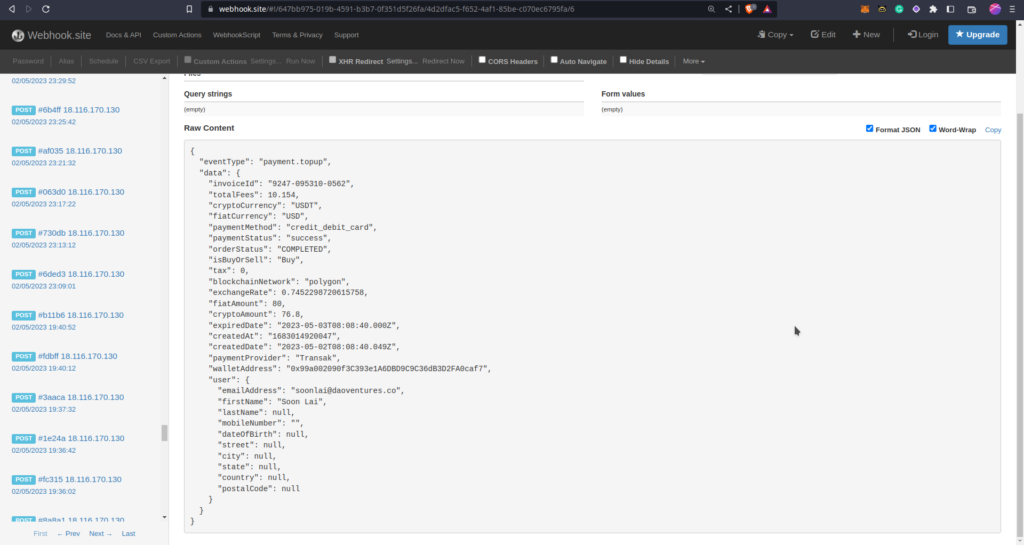
Webhook will be triggered automatically when the transaction is done with the eventType of “payment.topup”. The webhook will also contain the Status Code where we can check if the transaction is success, failed or in pending state.

Webhook Event CodeDescriptionStatus Code
payment.topupThe purchase order transaction is executed successfully.success
payment.topupThe purchase order transaction is failed to executed.failed
payment.topupThe purchase order transaction is processing. There are different *orderStatus* in the event data to indicate the process stage of the order.pending

Using Postman to Call Fiat-to-Crypto API’s

There are a lot of different APIs to customize the user experience and developers can build any app using the same.

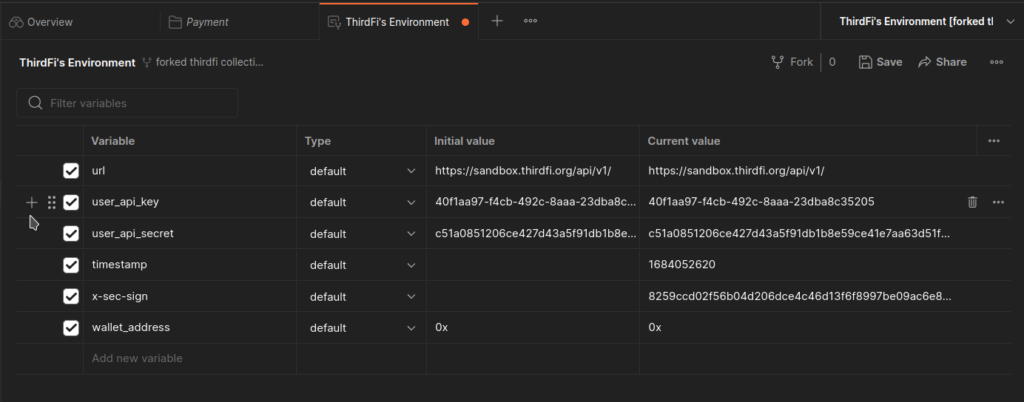
First of all, add the API key and Secret key as environment variable in the forked postman workspace.

You can test out all of them from our Postman Workspace. Below are the listed APIs under Pay API.

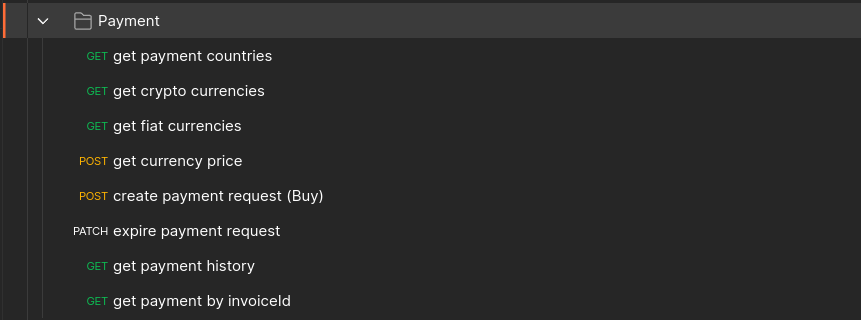
Pay API GET Requests

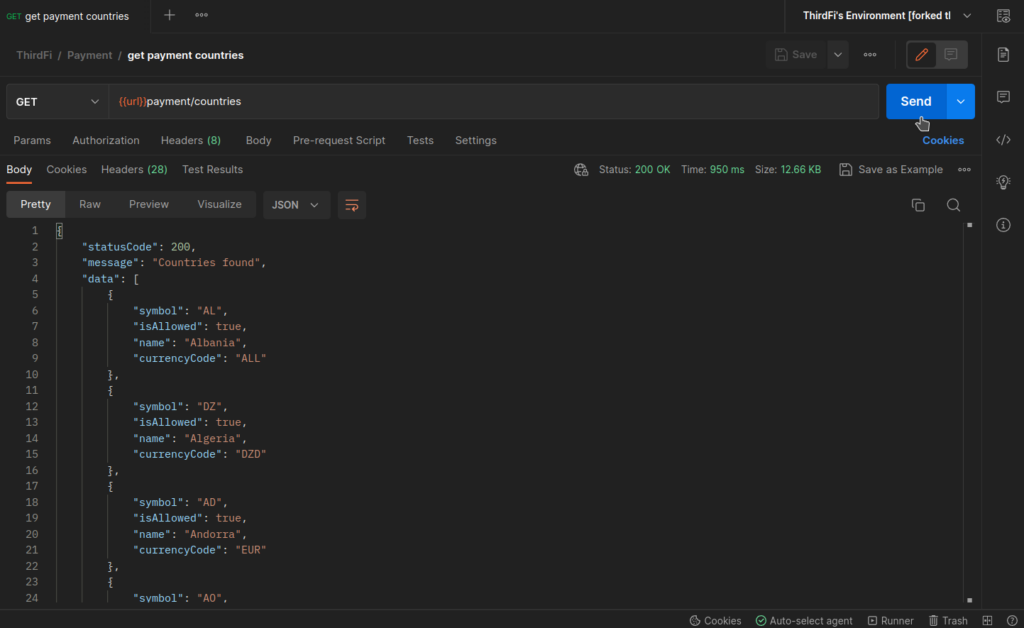
1. Get Payment Countries – This API will get the list of supported countries and their respective currency code.


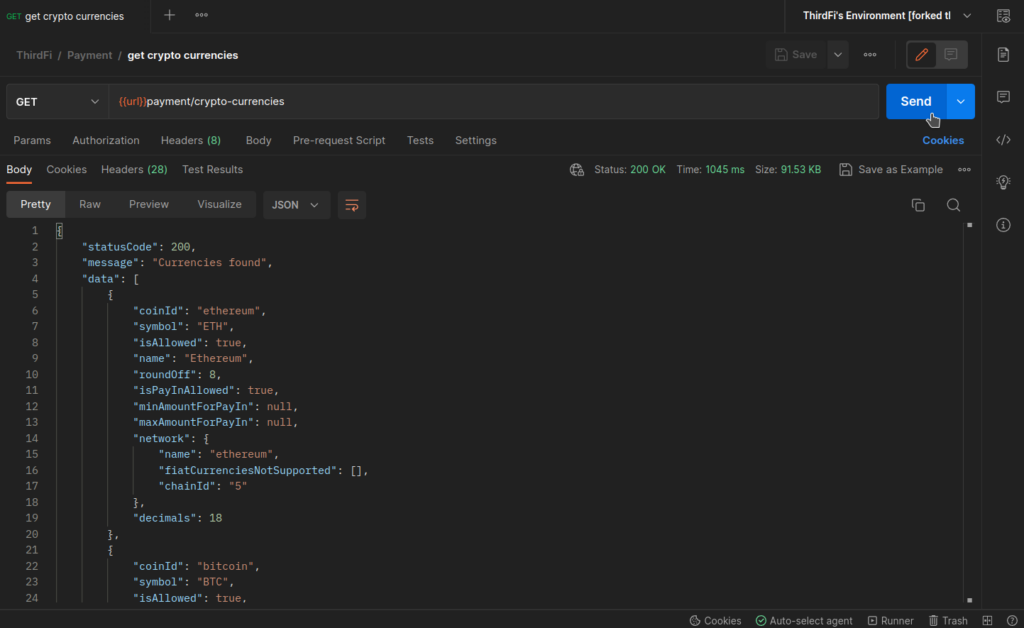
2. Get Crypto Currencies – This API will get the list of supported cryptocurrencies with their network.


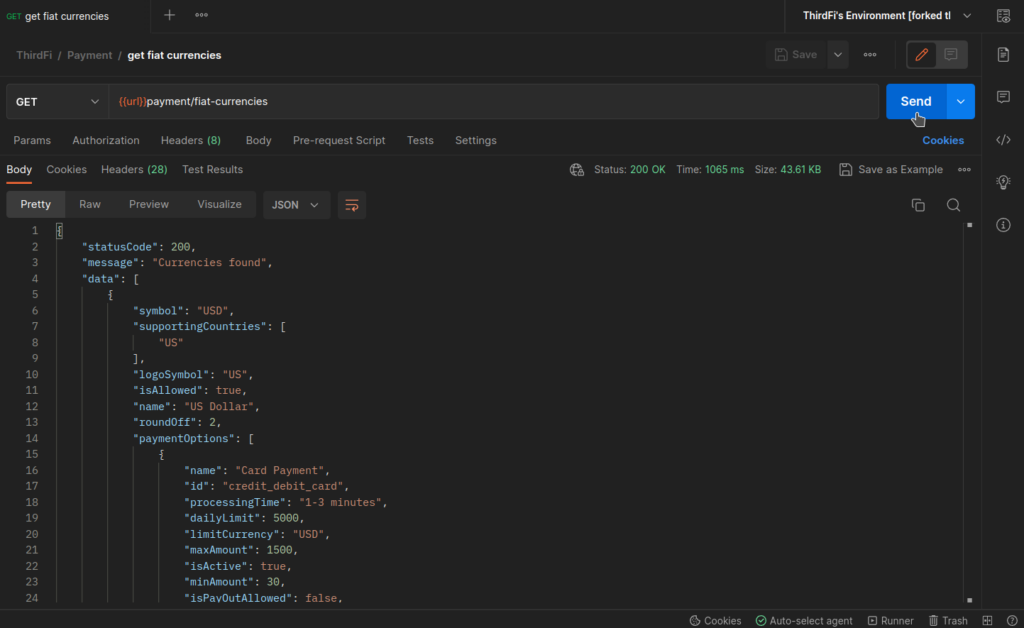
3. Get Fiat Currency – This API will get the Payment methods supported by Fiat currency.


4. Get Payment History – This API will list all the payments with their details such as InvoiceId and details about customer.


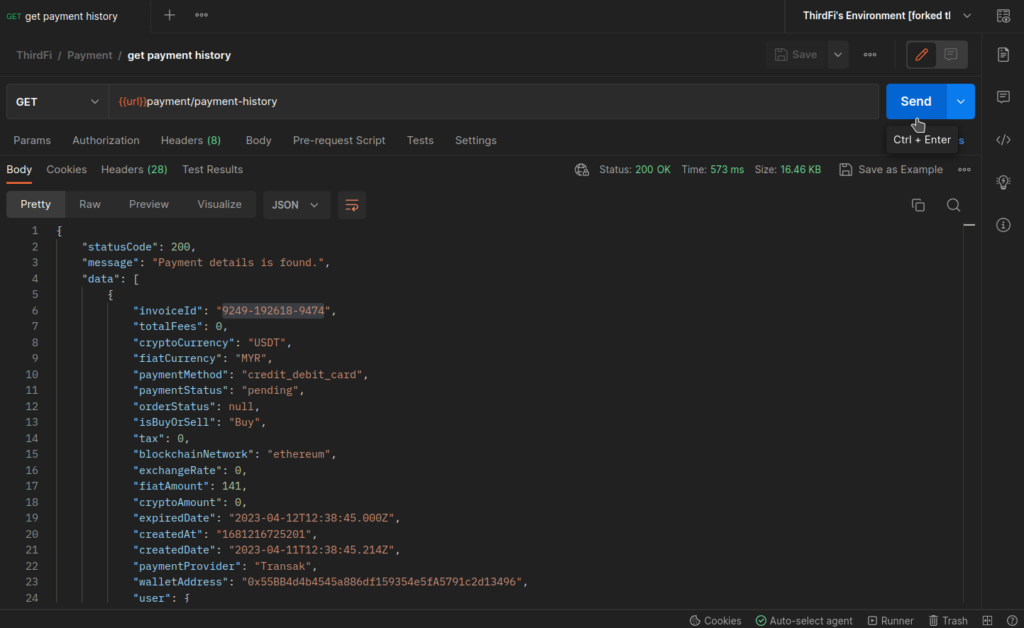
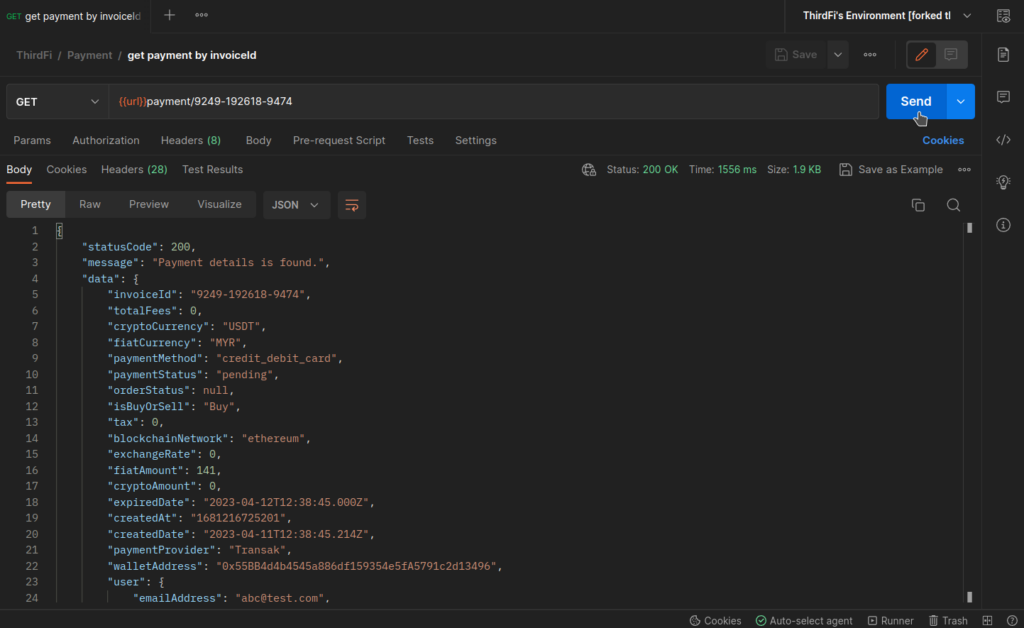
5. Get Payment with Invoice Id – If we have the InvoiceId, we can get the payment metadata for the particular Payment.

Pay API POST/PATCH requests

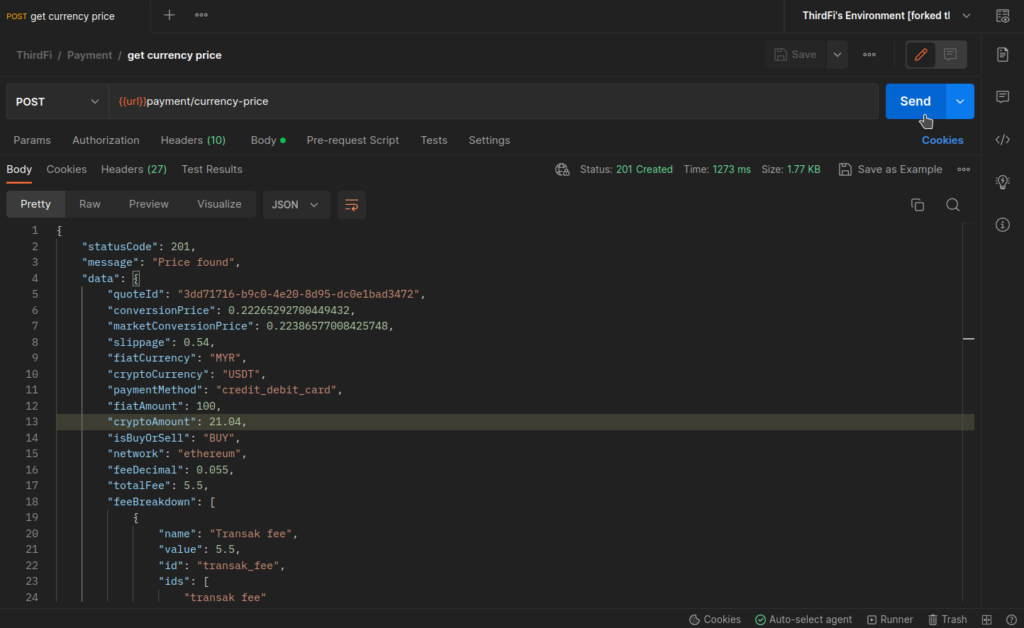
1. Get Currency Price – The Crypto/Fiat can be fetched by making a POST request to this API.

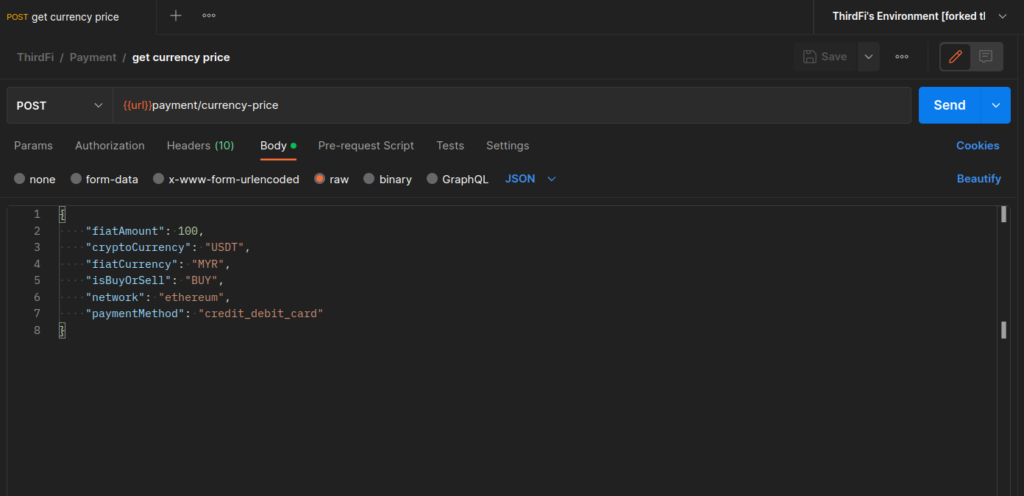
This API will fetch the price and fee for the amount of crypto as per the fiatAmount, fiatCurrency, network and paymentMethod provided in the body.


2. Create a Payment Request – This will create a session to get crypto using fiat and response will contain the session URL.

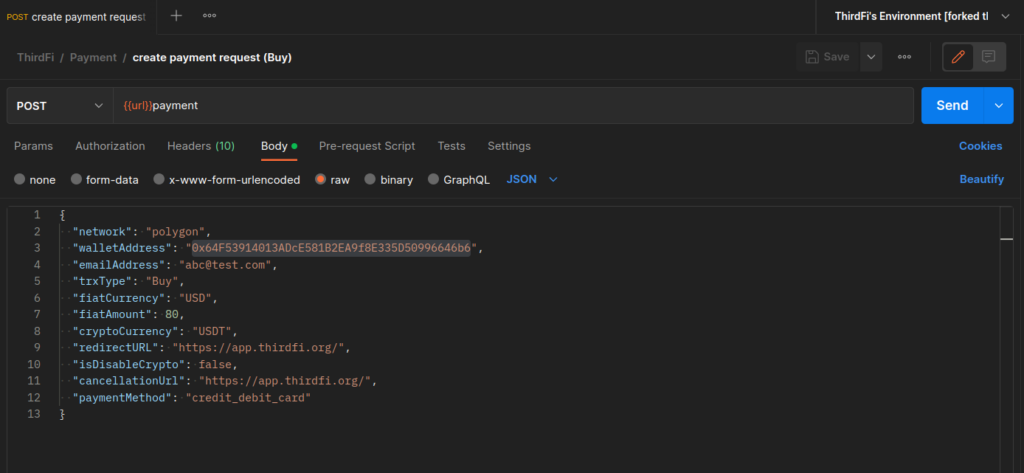
Using the Body containing network, wallet address, emailAddress, trxType, fiatCurrency, fiatAmount and cryptoCurrency, a user can get a webview URL where they can do the transaction and BUY cryptocurrencies.

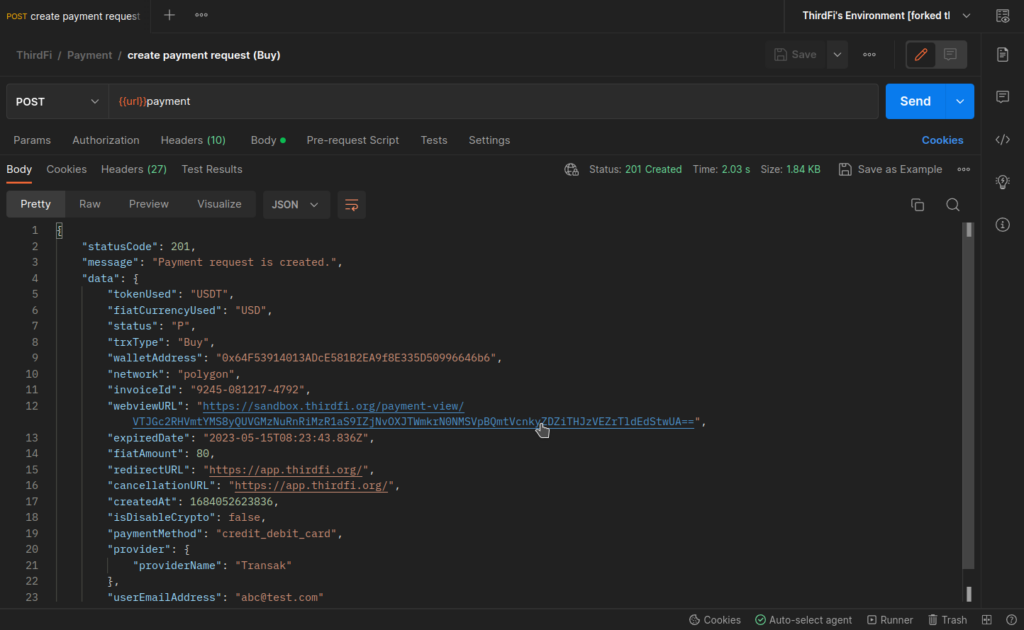
The URL will redirect to the payment gateway webview provided by ThirdFi to make payments and get crypto on the respective wallet address. The user needs to do a little KYC process and then they can buy the crypto assets.


3. Expire Payment Requests(PATCH request)

To expire payment requests, the developers can make a PATCH request by adding “invoice-id”(here 9249-192618-9474) after the base API URL.

Hope you find the blog useful. Check out our docs here to know more. Also, here is the API reference to learn more about the Pay API and check out its working.

Feel free to reach out to us on our Socials

Website | Twitter | Discord | Youtube | Linkedin 

Supercharge DeFi with ThirdFi⚡
Code, deploy & profit with ThirdFi

© ThirdFi 2023. All Rights Reserved.

Quick Links

Doc